How do I use the Crumple Paper Furniture Concept Design template?
Choose the primary action to open PicX Studio with the available template settings. Review the model and format, personalize the creative direction, and generate when ready.
An extensive architectural and product design prompt that translates the organic textures of crumpled paper into high-comfort sculptural furniture like chairs and sofas. Change the subject, setting, or lighting one variable at a time.
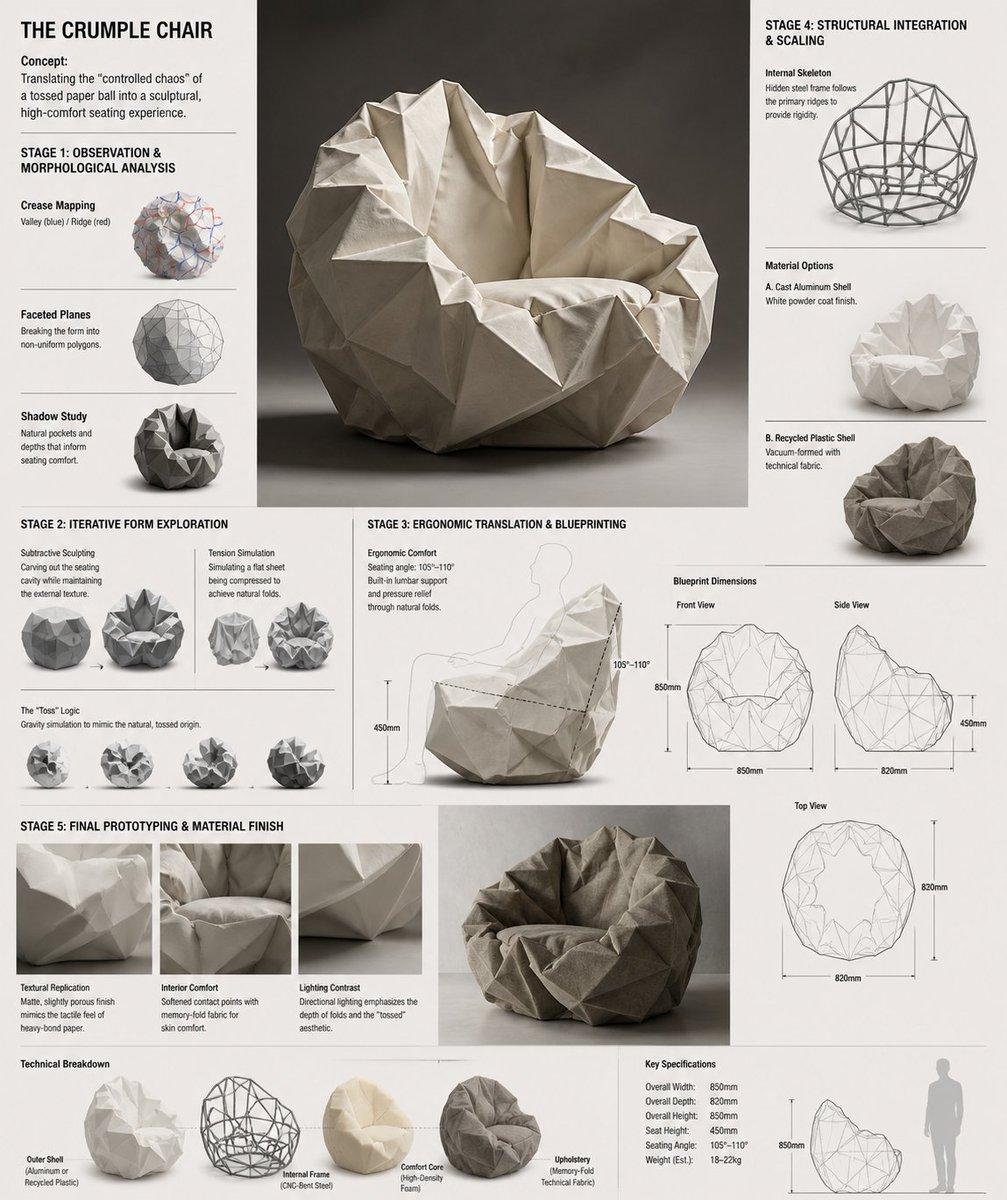
Design Concept: {argument name="furniture type" default="The Crumple Chair"} Core Philosophy: Translating the "controlled chaos" of a {argument name="inspiration" default="tossed paper ball"} into a sculptural, high-comfort seating experience.\n\nStage 1: Observation & Morphological Analysis The goal is to deconstruct the image of the crumpled paper into usable geometric data. Crease Mapping: Identify the primary "valley" and "ridge" lines. These represent potential structural ribs or seams in the chair. Faceted Planes: Break down the sphere into a series of non-uniform polygons. Each flat surface of the paper becomes a potential panel for the chair’s upholstery or shell. Shadow Study: Analyze how the "tossed" form creates deep recesses. These natural pockets guide where the user’s weight will be cradled. \n\nStage 2: Iterative Form Exploration Moving from a sphere to a seat through "Digital Crumpling." Subtractive Sculpting: Imagine the paper ball as a solid mass. Use Boolean operations to "carve out" a seating cavity that fits the human form while maintaining the external jagged texture. Tension Simulation: Use 3D software (like Rhino or Blender) to simulate a flat sheet of material being compressed. This ensures the folds look authentic and not "modeled." The "Toss" Logic: Experiment with gravity-based simulation dropping a digital mesh to see how it settles naturally, mimicking the "tossed" origin. \n\nStage 3: Ergonomic Translation & Blueprinting Refining the raw aesthetic into a functional object. The Comfort Core: Overlay a standard ergonomic template (Seating Angle: 105°–110°) over the crumpled form. Adjust the internal "folds" to provide lumbar support and pressure relief. Blueprint Generation: Create technical orthographic views (Front, Side, Top). Map out the dimensions: Seat Height: 450mm Total Width: 850mm Surface Smoothing: Maintain the sharp "paper edges" on the exterior shell while softening the interior contact points for skin comfort. \n\nStage 4: Structural Integration & Scaling Making the concept physically viable. The Skeleton: Design a hidden internal frame (likely CNC-bent steel rods or a 3D-printed lattice) that follows the most prominent ridges of the paper folds to provide rigidity. Material Selection: * Option A (High-End): {argument name="material" default="Faceted, cast aluminum"} with a white powder coat. Option B (Soft): Vacuum-formed recycled plastic shell covered in "memory-fold" technical fabric that retains a wrinkled appearance. \n\nStage 5: Final Prototyping & Material Finish Textural Replication: Apply a matte, slightly porous finish to the material to mimic the tactile feel of heavy-bond paper. Lighting Contrast: Use directional studio lighting in the final renders to emphasize the "tossed" shadows, making the chair look like a giant piece of discarded inspiration. Design Tip: To keep the "tossed" look authentic, avoid symmetry.
Choose the primary action to open PicX Studio with the available template settings. Review the model and format, personalize the creative direction, and generate when ready.
Yes. You can change the subject, setting, lighting, mood, format, and available model controls before creating your image.
This template is free to open and customize. Generation usage is shown in PicX Studio before you create.
Start with GPT Image 2, which is the model associated with this template. You can compare another compatible model for a different finish.
© 2026 PicX Studio. All rights reserved.

Follow a topic to a crawlable collection of related PicX Studio templates.
43,474 public templates available. Verified via the PicX Studio public templates API; refreshed hourly.


![Glass Brand Logo Volcanic Landscape — [BRAND NAME]. CGI cinematic hero landscape with a glass logo sculpture emerging from volcanic rock.…](/_next/image?url=https%3A%2F%2Fcdn.picxstudio.com%2Fuploads%2Fmeigen_a9fd468cb68d_a2e4e108-a6bc-443c-8644-48d0f477dfee.jpg&w=828&q=100)
![Watercolor Dreamscape — Nano Banana — A dreamlike watercolor study of a [subject], painted in airy impressionistic style with loose strokes and transparent [col](/_next/image?url=https%3A%2F%2Fcdn.picxstudio.com%2Fuploads%2Fazed_watercolor_HGLsJBwbwAArl7H_51d66b1e-6f5a-4c80-9384-1e0b0db0f6c3.jpg&w=828&q=100)







![A hyper-detailed origami folded from realistic colored paper — A hyper-detailed origami [FOOD ITEM] folded from realistic colored paper with visible creases and](https://images.meigen.ai/tweets/2007809696334479420/0.jpg)


![Minimalist Flat Vector Travel Poster — Premium minimalist flat-vector travel poster for {argument name="city name" default="[CITY_NAME]"}, 3:4 vertical format.](https://cms-assets.youmind.com/media/1787917359711_3ug846_HQX205cbMAA6F6S-300x400.jpg)
































![Infographic Prompt Template for Body Parts — Create an infographic image of [{argument name="body part" default="Eye"}], combining a realistic photograph or pho](https://pbs.twimg.com/media/G_YaM8_W0AAX6Ox.jpg)






![Technical Cross-Section Diagram — Hyper-detailed technical cross-section diagram of a {argument name="object" default="[type here object]"} rendered in a dark e](https://cms-assets.youmind.com/media/1777539320782_lipcbg_HHEf1rVbUAEy-2z.jpg)