How do I use the Neon M5Stack Usage Gauge template?
Edit the prompt in the box under the preview — the template's model and format are already selected — and press Generate. Your version appears right on this page.
Transforms a simple Claude Code usage gauge into a polished neon HUD dashboard for an embedded M5Stack-style screen.

This template uses your photo — add one with the + button.
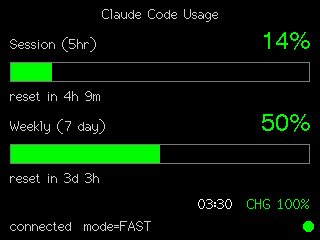
Using the provided reference image as the functional UI base, redesign it into a polished neon-green cyberpunk terminal interface suitable for an M5Stack-style 320×240 display. Keep the same two usage meters and overall information hierarchy, but replace the plain black layout with thin glowing vector line art, angular framed panels, pixel/monospace typography, and sci-fi HUD decorations. Convert the two meters into 2 stacked framed cards: 1) “SESSION 5H” with a crosshair icon, large percentage “{argument name="session percent" default="18%"}”, a segmented horizontal progress bar, and a clock/reset row reading “{argument name="session reset text" default="RESET IN 2H 40M"}”; 2) “WEEKLY 7D” with a crosshair icon, large percentage “{argument name="weekly percent" default="51%"}”, a segmented horizontal progress bar, and a clock/reset row reading “{argument name="weekly reset text" default="RESET IN 2D 17H"}”. Add a top header reading “{argument name="header text" default="CLAUDE CODE USAGE"}” centered, with decorative diagonal tick marks on both sides and a small plus sign at the top right. Add a bottom status bar with exactly 5 visible items: a green status dot, “RATE_LIM”, “MODE=FAST”, “13:28”, and “CHG 75%”. Use only black background, bright green strokes, darker green grid/bar outlines, and crisp pixel-perfect rendering; make the final image look like a refined embedded-device dashboard rather than a flat mockup.
Using the provided reference image as the functional UI base, redesign it into a polished neon-green cyberpunk terminal interface suitable for an M5Stack-style 320×240 display. Keep the same two usage meters and overall information hierarchy, but replace the plain black layout with thin glowing vector line art, angular framed panels, pixel/monospace typography, and sci-fi HUD decorations. Convert the two meters into 2 stacked framed cards: 1) “SESSION 5H” with a crosshair icon, large percentage “{argument name="session percent" default="18%"}”, a segmented horizontal progress bar, and a clock/reset row reading “{argument name="session reset text" default="RESET IN 2H 40M"}”; 2) “WEEKLY 7D” with a crosshair icon, large percentage “{argument name="weekly percent" default="51%"}”, a segmented horizontal progress bar, and a clock/reset row reading “{argument name="weekly reset text" default="RESET IN 2D 17H"}”. Add a top header reading “{argument name="header text" default="CLAUDE CODE USAGE"}” centered, with decorative diagonal tick marks on both sides and a small plus sign at the top right. Add a bottom status bar with exactly 5 visible items: a green status dot, “RATE_LIM”, “MODE=FAST”, “13:28”, and “CHG 75%”. Use only black background, bright green strokes, darker green grid/bar outlines, and crisp pixel-perfect rendering; make the final image look like a refined embedded-device dashboard rather than a flat mockup.
Neon M5Stack Usage Gauge needs input media to work. Open it in the studio and these load alongside the prompt — pick whichever ones your chosen model can take.
Edit the prompt in the box under the preview — the template's model and format are already selected — and press Generate. Your version appears right on this page.
Yes. You can change the subject, setting, lighting, mood, format, and available model controls before creating your image.
Opening and editing this template is free. Generating uses credits, shown on the Generate button when you are signed in.
Start with GPT Image 2, which is the model associated with this template. You can compare another compatible model for a different finish.
Follow a topic to a crawlable collection of related PicX Studio templates.